Overview
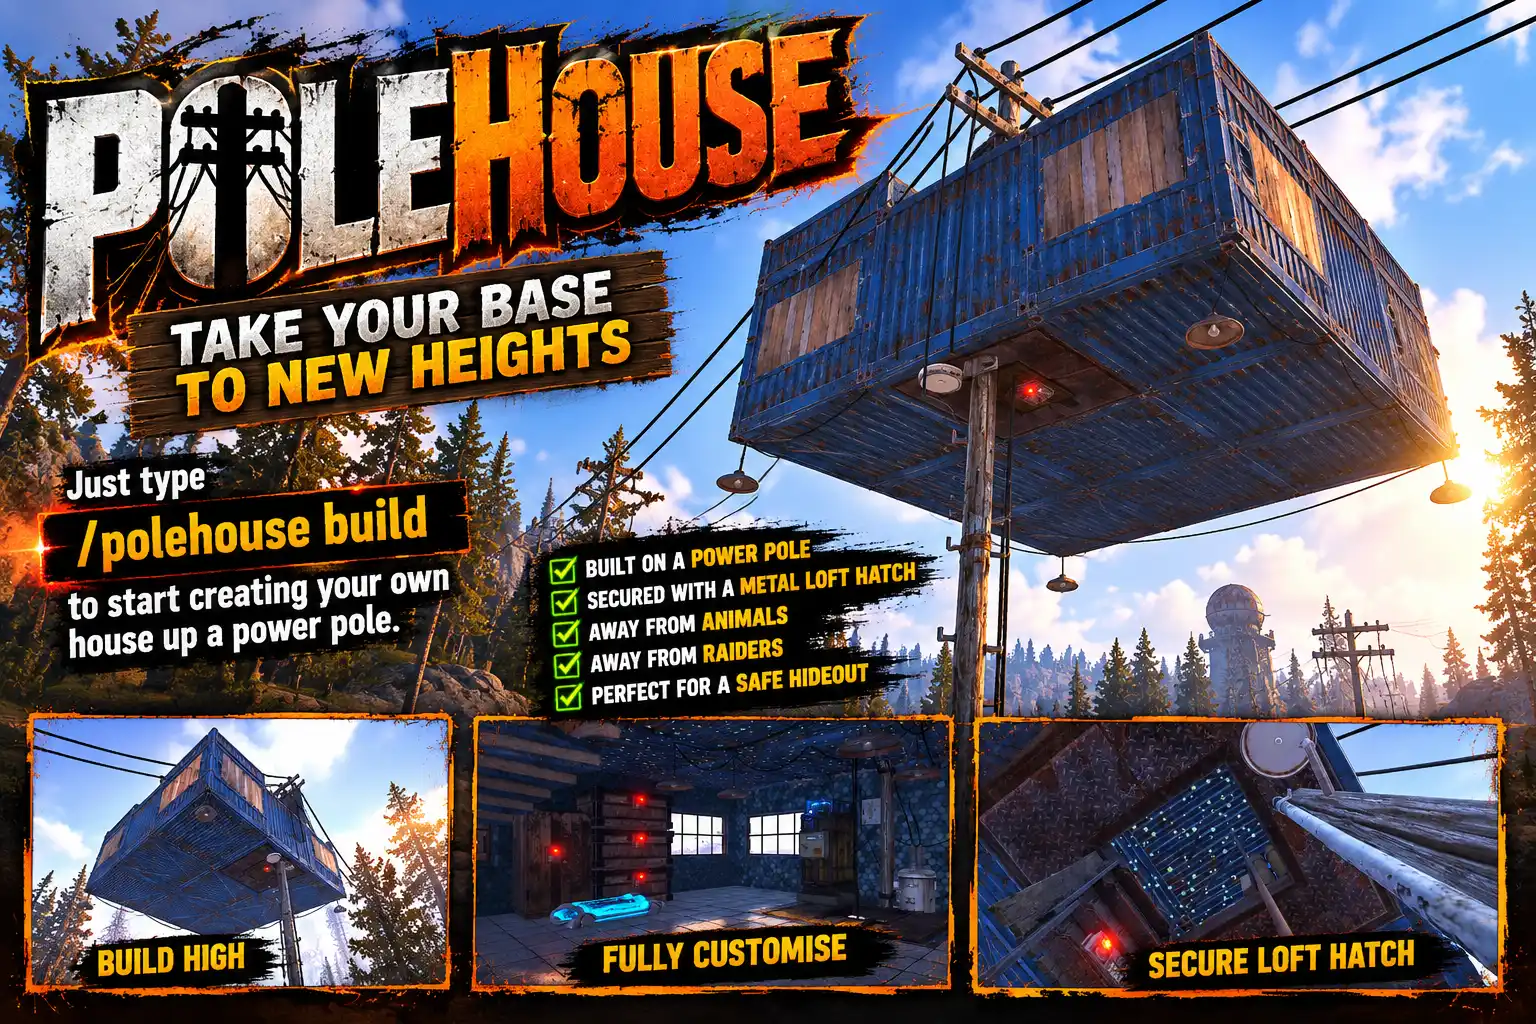
PoleHouse lets players build a base up one of the climbable power-line poles that line the roads. One command puts a floor frame with a ladder hatch beside the pole, well clear of the ground. Players climb the pole's rungs, come up through the hatch, and build the rest themselves with the normal building plan and their own materials: floors, walls, doors, a cupboard and whatever goes in it.
The pole is part of the map, but once you've claimed it its yours to build on. PoleHouse fixes the first piece to the pole and leaves the rest to you. The game's own building rules, grades, upkeep and raiding all apply.
Building a pole house, step by step
1. Find a pole. Type /polehouse find. Chat lists the nearest free poles that have room for walls on every side, with the grid square, how far away each one is and which way to walk (a compass bearing). A pole is free when nobody has built on it and no one else's tool cupboard covers it.
2. Put up the frame. Stand within 8 m of the pole and type /polehouse build. You pay the cost from your inventory, by default the game's own price for the pieces it puts up:
- 1 wooden ladder, 300 metal fragments and 3 gears (the ladder hatch)
- 100 wood (the twig floor frame, a wall and a ceiling)
Up go a twig floor frame with a ladder hatch in it, a twig wall on the frame's pole side supports your first ceiling panel. PoleHouse chooses which side of the pole to build on for you. It is always a side the rungs stick out on (never the side with the transformer box) and the side furthest from the road, so you don't have any problems building near the road.
3. Climb in. Climb the pole's rungs on the hatch side, open the hatch with E at the top, and climb up into the room.
4. Claim it. Put a tool cupboard down early, as you would anywhere else. It protects the build and lets your team build with you.
5. Lay the first floors against the frame. Use the building plan to put floors (or triangle floors) against the frame's three open sides. Each one says "Braced to the pole." These braced floors are held by the pole, just as the frame is, so they are as strong as it gets. Build them first, before you spread out.
6. Spread out. Carry on with floors, walls, doorways, windows, stairs and roofs as normal. Stability drops the further a piece is from the pole, as it would from a foundation. On our test house the braced floors read 100%, the next floors out about 54%, and the rooms beyond 20-32%. Grade makes no difference to stability, so a twig house holds as well as a metal one.
7. Go up a storey. The ceilings over your rooms are the floor of the next storey. The pole's crossarm, near the top of the pole, keeps the building plan from placing anything right beside it, so build upwards on the rooms further from the pole.
8. Upgrade and furnish. Upgrade with the hammer as usual (the frame can be upgraded too), add doors and locks, and deploy whatever you like. It is an ordinary base, except that it is in the air.
9. Power it (optional). Every pole has a power transformer that can be set to supply power. If you choose to enable this feature it defaults to 50rW of power. More than enough to keep your batteries charged. And that' 50rW night and day - unlike solar!
If the hatch is ever destroyed, /polehouse hatch fits a new one in your house's frame, for the cost of a ladder hatch.
Why it stays up
- Bracing. A mixture of bracing, good luck and sheer physics defying ingenuity are the only things keeping your house in the air. Check the stability factor with your hammer and the numbers don't lie - your house is good for a decent amount of floor space and multiple levels of building.
- It can still be raided. Destroy the frame and the bracing lets go: the house comes down through the game's own stability, the same as knocking out a foundation. Every other piece can be destroyed as normal. So build up your defences and keep the enemy away.
Fair on a live server
- One house per player by default, and one house per pole.
- Not under someone else's cupboard. A pole inside another player's building privilege cannot be built on.
- The way in is protected. Nobody else can build or place anything against a pole house's pole, its rungs or the power point at its foot, so nobody can wall in the ladder or cut the power. The owner, their team and anyone authorised on the house's cupboard still can.
- Room is checked. The frame is not put up if a building piece, a deployable, a tree or a vehicle is in its space, or if the ground below is less than 3 m down. So you don't be able to start and find you have problems later.
Power without the grid
A pole's power point only gives power while the server's power grid is running, and on many servers it is not. The Power without the grid setting has three choices:
- Off: the game's own behaviour (the default).
- Pole: anything wired to the transformer terminals is given power whenever the grid gives none. A switch extends it to every pole on the map.
- Generator: every pole house gets a small generator at the foot of its pole to wire from. It cannot be damaged or picked up.
You choose how much power each house gets. Leave it at 0 for the game's own maximum for a pole.
Every setting, in game
/polehouse setup (for polehouse.admin) opens a panel with every setting and both cost lists. Type a value and press Enter, or click a switch, then press SAVE. The config file is written and the new settings are in use at once, with no reload. DISCARD puts everything back.
- What a pole house costs: any items, any amounts. Empty is free.
- What a new hatch costs: the same, for
/polehouse hatch. - Most pole houses a player may have: default 1.
- How near the pole to stand to build: default 8 m.
- Pole to hatch opening: how far the pole stands from the middle of the hatch opening on new houses, 0.75-1.3 m. Default 1.0 m, which leaves room to climb in. Above that, the wall on the pole side runs into the pole's light box on about a quarter of poles.
- Brace floors against the frame: default on. Switched off, a big house may fall.
- Keep others from building against the pole: default on.
- Power without the grid: Off, Pole or Generator, with the power each house gets and whether Pole power is only for pole houses.
- Poles listed by /polehouse find: default 3.
The config file can still be edited by hand if you prefer.
For admins
/polehouse removepulls down the nearest pole house within 30 m, whoever owns it, and gives you back its cost, its building pieces at their current grade, its deployables and everything that was stored in it. Use it to tidy up an abandoned house or return a player's materials.- On the console:
polehouse.statuslists every pole house,polehouse.pieceslists every piece's stability (polehouse.pieces recordsaves a snapshot, and later listings mark what has changed since), andpolehouse.surveyreports how many poles on the map have room for walls on every side.
Restarts and wipes
Pole houses are saved with the map, and the bracing is put back at every start - so no instability issues. On a new map, or if the server loads a different save, the plugin's records are cleared automatically, so there is nothing to tidy up on wipe day. The positions of the map's poles are worked out once per map and remembered, so start-up stays quick.
Languages
English, Russian, German, French, Spanish, Brazilian Portuguese and Simplified Chinese are built in, with no lang files to install. Each player sees the language their own client is set to. Item names in a cost stay in English.
Every download is licensed to you and watermarked with your details.
Features
- A base up any of the climbable power-line poles by the roads
- One command puts up a floor frame with a ladder hatch 7.5 m off the ground, plus a starter wall and ceiling
- Climb the pole, come in through the hatch, and build the rest with the normal building plan
- Built on the rung side away from the road, where every wall can be placed
- Floors against the frame are braced to the pole, so the house can spread and go up a storey
- Bracing put back at every restart, so a house never falls after a reboot
- Still raidable: destroy the frame and the house comes down
- /polehouse find lists the nearest free poles with grid square, distance and bearing
- Nobody else can build against your pole, its rungs or its power point
- /polehouse hatch replaces a destroyed hatch
- Optional power without the grid: from the pole, or from a generator at its foot
- Cost set by you; the game's own price by default
- One house per player by default, one per pole
- Every setting and both costs changed in game, with no reload
- Admin remove gives back the cost, the pieces, the deployables and the loot
- Clears itself on a new map
- Seven languages built in
Install
- Download PoleHouse.cs from My Plugins.
- Drop it into
oxide/pluginsorcarbon/plugins. - Grant the permissions:
o.grant group default polehouse.use
o.grant group admin polehouse.admin
On Carbon use c.grant instead of o.grant.
The file name must stay PoleHouse.cs, because Oxide matches it to the class name.
Nothing else is needed: no image plugin and no other dependencies.
The config is written to oxide/config/PoleHouse.json (or carbon/configs/PoleHouse.json) on first load, with the costs filled in from the game's own prices. Change it in game with /polehouse setup, or edit the file and reload the plugin (o.reload PoleHouse or c.reload PoleHouse).
To let a group build without paying, grant it polehouse.free. To lift the limit on how many houses a player may have, grant polehouse.unlimited.
Config
{
  "What a pole house costs with /polehouse build (item short name: amount; empty is free). Filled with the game's own price of a ladder hatch, a twig floor frame, wall and ceiling on first start": {
    "ladder.wooden.wall": 1,
    "metal.fragments": 300,
    "gears": 3,
    "wood": 100
  },
  "Most pole houses one player may have (polehouse.unlimited ignores it)": 1,
  "How near the pole a player must stand to build (metres)": 8.0,
  "How far the pole stands from the middle of the hatch opening, for new pole houses (metres, 0.75 to 1.3; the opening's edge is 0.65 out, the frame's edge 1.5; above 1.0 the wall on the pole side hits the pole's light box at about a quarter of poles)": 1.0,
  "Brace floors built against the hatch frame to the pole, so they hold as well as the frame": true,
  "What a new hatch costs with /polehouse hatch, after the old one was destroyed (item short name: amount; empty is free). Filled with the game's own price of a ladder hatch on first start": {
    "ladder.wooden.wall": 1,
    "metal.fragments": 300,
    "gears": 3
  },
  "Power without the grid: Off, Pole (anything wired to a pole's own power point gets power while the grid gives none) or Generator (a generator at the foot of every pole house's pole)": "Off",
  "That power (0 is the grid's own full output, powergrid.powerlinemaxpoweroutput)": 0,
  "Pole power only at poles with a pole house (off: every pole's power point on the map)": true,
  "Keep other players from building or placing anything against a pole house's pole, its rungs and its power point (the owner, their team and anyone authorised on the house's cupboard still may)": true,
  "How many free poles /polehouse find lists": 3
}
Commands & Permissions
Commands
Chat
/polehouse— what a pole house costs you and how many you have/polehouse find— the nearest free poles with room for walls on every side: grid square, distance and bearing/polehouse build— put up the frame, hatch, starter wall and ceiling at the nearest pole within 8 m/polehouse hatch— fit a new hatch in your pole house after the old one was destroyed/polehouse setup— the settings panel (polehouse.admin)/polehouse remove— pull down the nearest pole house within 30 m and get back its cost, pieces, deployables and loot (polehouse.admin)
Console (server console, or a player with polehouse.admin)
polehouse.status— every pole house: owner, frame stability, how many floors are bracedpolehouse.pieces [record]— every piece's stability;recordsaves a snapshot, and later listings mark what changedpolehouse.survey [gap]— how many poles on the map have room for walls on each sidepolehouse.setup— opens the settings panel (bindable)
Permissions
polehouse.use— build a pole house and use/polehouse find(an owner can always fit a new hatch in their own house with/polehouse hatch). Grant it to the default group to let everyone build onepolehouse.free— building and replacing a hatch cost nothingpolehouse.unlimited— no limit on how many pole houses the player may havepolehouse.admin— the settings panel,/polehouse removeand the console commands;/polehouse hatchworks on anyone's house
Changelog
| Version | Released | Changes |
|---|---|---|
| v0.4.6 latest | — |